Cutest Blog on the Block

Showing posts with label diy. Show all posts

Wednesday, January 23, 2019

DIY Mini Keepsake Album


I love 2 things right now, Journaling Cards from GROWING MEADOWS and Little Mini Happy Planners!!! I have bought a couple of these Mini Keepsake Planners, but wanted to try my hand at customizing one for myself!
I found that the Journal Cards are the same size as the covers on these tiny planner books.
These are available here:  Tambourine Journaling Cards

I started out by rounding the corners on my cards and then laminated them. 
I found some paper bits and used a sheet from the MAMBI mini, that I purchased, as a guide to cut out several sheets of printed papers. I used the same sheet to mark where to put my holes. 
I used a regular hole puncher and then scissors to make a small V from the edge. This helps them slip onto the discs. 


Here's the back cover. 

This was such a fun little project! Imagine all the fun variations that you could make. One for sports, movies, baby milestones, weddings, etc!!!! 

Thanks for stopping by! Be blessed!!!


Monday, October 08, 2018

Need a cute card? No ProbLLAMA!!!

Woah! It's been a month since my last post!! Guess my question is, does anyone read blogs anymore?

Oh well, just in case.....here ya go!

It's no news that Llamas and/or Alpacas, Unicorns and Rainbows are super popular right now. I, myself, are loving them. 
So when I found these cute Llama tags, I just knew I had to do something fun with them! What could be more fun than making handmade cards!!? 


As always, thanks for stopping by!! Have a blessed Monday!


Friday, June 09, 2017

"Micro" Bible Journaling

Happy Friday to you!!! Hope you had a great week!
I don't think there is such a thing as "Micro Bible Journaling", I just made it up at this instant! But I do want to share this with you.........

 I wish I could say I came up with this idea..but I didn't! I was inspired by Tai Bender of Growing Meadows.  You really should Google her work, you will fall in love too!!!!

She does the cutest bible journaling in a little book of Psalms. She also uses a little traveler's notebook, but I don't know the details of it. When I saw it, I thought..."I love that!! It's a great way to carry God's encouraging words with me daily!!!"


#0 Foxy Fix Sugar Cupcake

 I didn't have a little book of Psalms, but I did have my Micro Foxy Fix, and found that it worked perfectly! I bought some water color paper, cut it down to size and made a booklet with it. I bought water color paints on Amazon, and pulled out my rubberstamps!


      I have really been enjoying this process, because I love creating, and reading God's word brings me comfort. Now when I'm feeling stressed, anxious, sad, angry, happy, etc....I can pull my Micro out of my purse, and be reminded of God's promises. 


Feather stickers, pink tassel, gold Washi Tape and binder clip are all from
Target's Dollar Spot.  Organza paper clip is handmade. 

Thanks for stopping by!! Have a blessed weekend!

Tuesday, May 23, 2017

Bible Journaling: Proverbs 3:13

Good evening to you! I hope your week is going well. I'm popping in this evening to show you a Bible Journaling page that I worked on this past Sunday. 

I'm using
 PROVERBS 3:13

"Blessed are those who find wisdom,
    those who gain understanding,"


Godly Wisdom is the ability to discern between right and wrong, God gives us the ability to seek wisdom by reading His word.
 In James 1:5 it says, "Ask for Wisdom and it will surely be given to you." By seeking God's wisdom, through His word, we gain an understanding. By meditating on His word and practicing it in our lives we gain wisdom from the Lord and this helps us understand the circumstances in life we may encounter. We may not always understand WHY, but we do understand that His WILL works in our favor. 


I absolutely LOVE woodland critters, especially Owls and Foxes!! My niece had a baby shower this past November and she found these super cute invitations and paper napkins at Hobby Lobby. 
I thought they were so adorable and knew I wanted to use them in a crafty project. 
I saw a YouTube video by Growing Meadows and Tai Bender used clear Gesso to mod podge a napkin to her bible page. After seeing this video, I couldn't wait to try the technique using these napkins. I haven't been able to purchase clear Gesso, so I used Clear ModPodge. The cute green Pom-Pom paperclip is from PEACHY CHEAP DEALS.
 Every day is a new deal, so if you see something you like, grab it right away!!!!
I also used various stickers that I had in my stash. 
I use an ESV Journaling Bible by Crossway. 

Thanks for stopping by! Have a blessed week!

Friday, May 19, 2017

I'm a Blessed Mama Bear

Happy Friday!!! 
I'm so happy it's Friday, I am off and have lots to do today! But first I wanted to share with you how I have been keeping so busy!!!

A couple of months ago, I moved my booth into a local shop. I"m calling it Blessed Mama Bear. 
We live in a small town, not many places to shop, so this boutique is a wonderful place!!! She calls it OLIVE. 

I've always loved crafting and have a room full of crafting stuff!! I thought, "what better way to enjoy crafting and clear out my crafting room?!" (I'm not sure that will ever happen, but hey, I'm trying!) LOL!!


I found this desk at a near by thrift store for $40! I painted it and distressed it. The back wall belongs to the shop, she painted wood pallets with a dark brown paint. My daughter helped me add little white LED lights behind the pallet wall. My Mom contributed the ladder. I think it used to go to bunk beds, but it's painted cream and looks so cute! 


All of my display pieces have come from a thrift store or Goodwill. 

I've got a little bit of this and that. I guess that's what makes it fun when it comes to crafting. 


Thanks for stopping by! Have a blessed weekend!!

Thursday, December 01, 2016

DIY: DOLLAR STORE CHRISTMAS GLOBE

Good Evening to you! Seems Christmas Globes are all the rage right now! I have seem them everywhere and have just been itching to make my own! I can't wait to shop for small cars and trucks to get crafty!!
But sadly, I haven't had much time to shop for treasures, but I DO have a few pieces laying around the house.

The only thing I bought today, was the $1 nativity set and $1 brush tip trees.

I had everything else on hand:

Like I said, I collected all this from around the house. The jar with handle was a purchase from Ross ($2.49), Fake snow was in an old ornament I had, Mini LED soft white strong lights were from Dollar General ($3? or $5?), Elmer's Craft dots from my stash, Nativity figure and Brush Tip trees were $1 each from Dollar General. 


And here's my $10 project!!


Jesus is the Reason for the Season!

I cannot wait to hunt for more treasures and create more Christmas Globes!

Monday, October 10, 2016

DIY: Cross Wall Hanging with Handmade Card


Happy Monday to you! I wanted to stop in quickly, and share a DIY I worked on some time back. I was needing a birthday gift and really wanted to create something special. 

So...I made this Cross Door Hanging, or Wall Hanging and a matching birthday card:


Okay...back to my daily chores!!
Have a great Monday!

Saturday, September 10, 2016

DIY: Fabric Pumpkins

Just in time for FALL weather! Well, atleast for some of you! I'm in south Texas so Fall won't really arrive til' maybe October!! But just looking at all the Fall decor puts me in the mood to craft and get ready for all the pretty fall colors!

The other day I was gifted an Orange Pancho Wrap, it was too big for me but was really nice. I looked at it a bit and thought...it would make some cute pumpkins!!! 

So, I got on Pinterest and started looking for a pattern, because I wasn't sure if my idea of putting a plate down on the fabric and tracing around it would work. 

I did find this one and it looked so fast and easy:
Fabric Pumpkins.

Here they are:

The only things I purchased was the Fiber Fill (stuffing) $3.74 and Green Burlap leaves $1.34 for 6, both from WalMart. 

The pancho was free, and I had the brown yarn, wine corks and twine. 

Then, since I was having such fun making these, I made some small ones:

Thanks for stopping by!!
Wishing you a wonderful Saturday!


Monday, March 28, 2016

Spring has arrived and my Pinterest Fail!

Oh MY gosh!!! Where has the time gone!? It has been forever since I have updated this blog. Life just seems to get in the way of my "ME" time. I honestly haven't had much time for crafting, this includes my bible journaling. I miss all of this so much and promise to be back in the swing of things soon.  I am SOOO excited to be getting my own craft room!!! I still need to decorate it and do some organizing, but when it's done, I will surely share it with you! 

I love Spring! It's like a rebirth for earth. What once was gray and brown, is now green and filled with bright colors from all the flowers! The birds are chirping, bees are buzzing and flowers are blooming!

I hope you had a wonderful Easter, these crafts aren't anything spectacular, but I wanted to make my kiddos a little Easter treat. So here it is:

 My 3 are all in their 20's, I also included my son's fiance. Boxes are from WalMart, they are filled w/ candy and for the girls I added some of the Target $1 sticky notes. Jars are recycled, and these little bunnies barely fit. I added some Foiled wrapped chocolate eggs,  but they would only fit in the back. 
This was a Pinterest Fail! LOL 

I also wanted to share some cute critters from around our place, just for fun!

Meet Otis, my neighbor's miniature donkey:

This is Mocha! My 2 yr. old Chocolate Lab.


And her brother Cocoa!


                              These cute little kittens don't have names, as we are hoping to find them a good home soon!


Have a wonderful Monday!!
Blessings, 
audrey


Saturday, February 20, 2016

That Darn "Crafting Bug"

Seriously! I'm supposed to be cleaning, but while cleaning, I will run into some stuff and think, "Hmmm, I could do something with this!" 


So there I go..I've been struck with the 

"Crafting Bug"
I put down the broom and pick up my glue gun!!!

I had bought this barn wood frame at the thrift store for about $1, the silver cross was a Christmas ornament I had bought but hadn't hung on the tree. The turquoise cross was a gift from a swap pal. I thought about adding it to a wreath, but while cleaning, I ran into these items and thought...I will put them all together somehow!!! Now, I am not a genius by any means, I had actually seen something similar on Pinterest (my obsession!) and pinned it knowing that I could whip it up with similar supplies. 


And here it is!! I cut up some burlap, found some cute animal print ribbon in my stash, and some brown burlap ribbon finished it off. 


I love it!!! And in a sense, I did some cleaning. These are a few items that I combined together and now I don't have to put them in their place. I can hang it on my wall and enjoy it!!!!

I'm sure my hubby would love if I caught the "Cleaning Bug" instead, but THIS makes me HAPPY!!!!

Have a blessed Saturday! 

*back to cleaning aka crafting I go!

Monday, February 01, 2016

DIY Valentine's Day Banner

I hope everyone is having a wonderful Monday! On Sunday evening I was supposed to be cleaning my craft room aka guest room. 
Funny thing is, instead of cleaning, I get hit with the "Crafting Bug"! 
Ever had that happen to you??

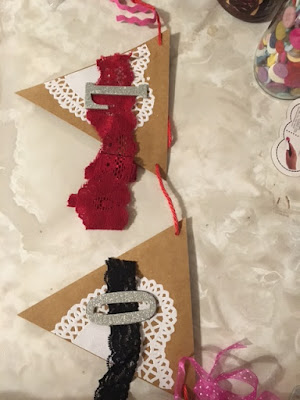
With Valentine's Day coming up, I found a banner I had a bought at Target's Dollar Spot...it's a super cute, ready to embellish banner for $1!! It came with 8 triangles to decorate, but I only needed 4, so now I have 4 left for another banner! 


As I was cleaning, I found lots of little things to put on m banner. A baggy of ribbons and trims.
A sheet of rhinestone stickers (left over from my Faith Banner), a jar of buttons and some twine.

I looked around for some letters to put on my banner and found a box of letters from my old scrapbooking days. The brand on these is Kurio. I was so disappointed because I couldn't find an "O"...BUT, I did find a "Q", SO, because I live out in the country and can't just run to the craft store, and because I was too lazy to look for more letters....I  trimmed it up to MAKE it an "O"!! And it worked!!!

I tried different trims of lace and ribbon until I liked what I saw. I then used my hot glue gun to attach all the cuties!

And I came up with this:

And here's my banner again!!! Very inexpensive and quick to put together. My favorite kind of crafting project!!

Have a blessed day!!!


Thursday, January 28, 2016

MAMBI Happy Planner DIY Tutorial

Good Thursday to you!!! I hope you have had a wonderful week!! 
Today I'd like to share with you a simple DIY for your MAMBI Happy Planner. 

In February the new MAMBI Happy Planner IG Challenge begins on Instagram. You can get the list from their blog sidebar: MAMBI BLOG
I wanted to keep this list handy in my MAMBI and being able to move it through each new week:

Some may ask, "What is this challenge?" Its a challenge on Instagram, a social media site, where you share photos. So with this list, you post a photo a day for that particular word aka subject. For example on Feb. 1, you post a photo or "selfie" of yourself and type a brief introduction. day 2 Feb 2nd: sticker: Post a photo of your favorite sticker(s), etc.


I found these cute adhesive backed "pockets" at Target's $ Spot. Each package comes with 4 and they are $1. I planned on using them to hold photos in my planner, that way I could switch them out from time to time and move them around in my planner. 


But when I saw this challenge, I thought this pocket would work great for my list. 


I started out by picking some cardstock to put my pocket on. This is a scrap piece from a 4x4 paper pad. 


I used a pencil to mark where to punch my holes.


I used a standard hole puncher and punched the holes in place.


I then used my scissors to cut a "slat" on each side of the holes. This makes it "PoP" into my discs. The second slat I cut was a little too wide, but it still popped into the disc and stayed put.


I put my list into my pocket, and adhered it to my cardstock piece. 


Now I have my list for the month of February. I can also replace it with the next Challenge list!


Have a great day!!
Be blessed!!

Sunday, January 24, 2016

DIY Banner Tutorial

Good Sunday evening to all of you!!! I didn't get much crafting done this weekend. It was a little busy this past week. 
But I do have lots of projects in mind for the near future. 

This evening I'm sharing a Banner Tutorial with you, requested by a young cousin of mine. Sofia is attending college and wants to decorate her dorm with a cute banner. I am flattered that she asked ME to show her how to make her own banner! 
So here you go Sofia, this one is for YOU!!! 

This is the Faith Banner I made and have hanging in my office. I made this a few months ago, so looking around in my mess for the exact supplies I used was nearly impossible. But I can show you some items I used or have used to make some quick, easy, and inexpensive banners.

For the banner above I used the plain Kraft banner pieces by AM (American Crafts), I found these at Joann Fabrics, but you can also find them at WalMart (red chevron one is from Walmart) and Target $1 spot has a cute variety too! These are great because they are reversible! So if I don't use the Red Chevron print, I can flip it over and use the plain Kraft side. I found the triangular shaped banner with white heart doilies and red twine for $1!! 
Targets $ spot is the way to go!!

Then I looked around my old scrapbooking stash and found some letters. You can use stickers, Poster Letter Pads (WalMart) or again....Target's $ spot has some cute fabric letter stickers for $3!!!

To decorate your banner you can use anything...for this banner I used white and black vintage seam binding. I found this whole roll at the thrift store for .50 cents! For the banner above I used these stickers, some I cut apart to stick on each banner flag. 
But you can use anything to decorate your banner, stickers, buttons, lace, ribbon, beads, rhinestones, etc!!!

The circles were cut with a Cricut machine and stencil, But you can cut circles by hand if you wish. You can also find some large stickers at WalMart if you don't want to cut scrapbooking paper. Think of using some Circle Chalk Stickers found at (WalMart).
I used glue dots and glue tape to adhere my pieces. You can also use a glue stick or double sided tape. 

I've had this cricut since my cardmaking/scrapbooking days. Bought it with a 40% off coupon at Michael's Craft Store. 


And pictured below are some goodies I found at Goodwill this past weekend! I am thinking of upcycling them into some cute projects!!!
Check back for the transformation!!!


Have a blessed week! And Happy Crafting!!!